Previously, Part 8: Finishing Touches
Update 2019-06-05:
Something to keep in mind, this article is written for my 2018 Model 3 Long Range with the Premium sound system. If you have a Model 3 Standard Range with a Standard or Partial Premium stereo, some of this information will to be relevant to you and some of it will not. The power systems and speaker locations/geometry will be the same, but you won't have the rear amplifier or subwoofer and some of your speakers will be disconnected. Other people are putting together how-to instructions for the SR/SR+ and the best compilation I've seen is here, on Tesla Owners Online.
----------------
This has been a big project. A little bit bigger than I anticipated and much bigger than I hoped. It has consumed most of my free time for the past four months. I've written up these posts here in the hopes that other people can do similar work in significantly less time, with very few unexpected problems.
I put myself on the waiting list for a Tesla Model 3 back in 2017, and I took delivery of my car in October 2018. This is my third car. The first two were Honda Civics, and as soon as I got those I tore them apart and installed aftermarket stereos. I expected I would do the same with my Model 3, but when I got it I found that the OEM stereo was actually really good. For an OEM stereo. It has good power, good detail, good clarity, good body, good just about everything. Frankly it's the best OEM car stereo I've ever heard. And that's compared to "premium" stereos I've listened to from Lexus, BMW, Acura, Volkswagen, Audi, and in the Tesla Model S. But it's still an OEM stereo. And I'm an audio snob. So after a few months I knew I had to upgrade.
The prospect of upgrading the stereo was a bit daunting at first because the Tesla Model 3 is not a regular car. The power and control systems are significantly different from those of traditional cars and Tesla is notoriously tight-lipped about providing disassembly and repair info for their vehicles. So I expected that I might break a few things and I would have to reverse engineer a few more things in order to get my aftermarket stereo up and running, but I guessed I could probably figure it out. And as it turns out the Model 3 is different, but not that different (for this purpose). And once you understand the (one major) difference, anyone who understands how a traditional car stereo works should be able to install an aftermarket system in a Tesla Model 3 with no problems at all.
This post is split into two parts. The first part summarizes all the reverse-engineering I did on the Model 3 and explains everything a typical car audio enthusiast needs to know to do their own aftermarket installation. The second part summarizes my own installation, parts of which might also be useful for other people building their own aftermarket systems.
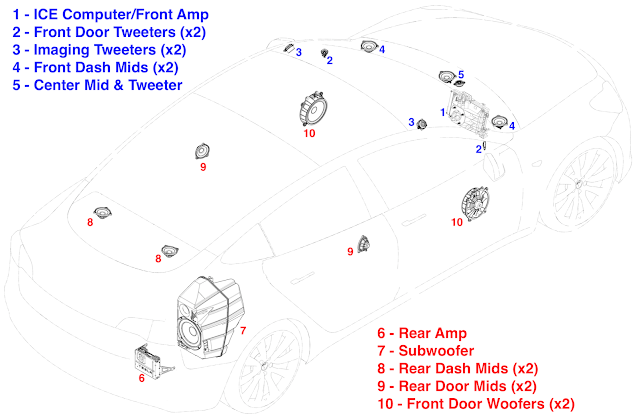
The Tesla Model 3 factory premium sound system has fifteen speakers powered by two amplifiers. (The standard sound system has eight speakers powered by one amp.) That includes five 1" tweeters, seven 3.5" mid-range speakers, two 7" woofers, and one 8" dual-coil subwoofer. They're all fairly standard paper-cone OEM speakers.


I did a spectrum analysis on the OEM speakers and got more or less textbook results. 40-60Hz is boosted way above everything else, because that's what people seem to like these days, but otherwise our spectrum looks very good.

Next I checked waveforms for clipping and found none. None at all. Even on the subwoofer, even at max volume. That's amazing in an OEM system. The Model 3's premium stereo is producing near-perfect sine waves at 45V.

Additionally, the OEM system gives a perfectly linear increase on all channels. Typically, OEM systems that have subwoofers stop boosting the subwoofer after a certain point because it's undersized compared to the rest of the system and they don't want to damage it, but the Model 3 premium subwoofer goes all the way up. This is really good news. This means we don't have to take any weird, nonlinear optimizations into account when designing and tuning an aftermarket system. The Model 3's OEM stereo just does what stereos are supposed to do, all the way to the top, without cutting any corners.
At this point we have several options, depending on what we want to do.


The front amp is built into the car's main computer (which I believe is called the "ICE" computer), so be very, very careful when working on this. If you cut the wrong wire, you could seriously damage your car. There are three connectors on the right side of the computer housing and the lower connector contains all of the speaker signals. I recommend turning the car off via the main menu (Settings → Safety and Security → Shutdown) before removing or reinstalling this connector.

Once you remove this connector, you'll have access to the front tweeter, mid-range, and center speaker signals. The center mid and tweeter are both powered by the same connection, with a capacitor filtering lower frequencies out of the tweeter. I tapped into these signals by cutting the wires coming out of this connector and splicing in my own wires, which run all the way to the trunk to my DSP. You could also use tap-in connectors to tap the wires without cutting them, though I've never been a fan of those.

To the right of ICE you have Low Voltage Control Right (VC_R). I believe this box contains various components that control various auxiliary functions, but I haven't found an actual teardown and analysis anywhere and I had no desire to open it up myself. What I do know is that VC_R and VC_L have a lot of connectors going through them and one of these connectors contains the wires that go into each respective front door. And that's where we can tap into the door speaker wires, so we don't have to route our own wires into the doors. For some reason the tweeter has its own connector, and the woofer is the largest wire pair on the larger connector. VC_R and VC_L are mirror images of each other and the connectors have the same wires in the same locations. Wires typically do not change color, so for example the left tweeter wire pair is purple/black when it comes out of the ICE computer and it's still purple/black when it goes into the left door via the VC_L connector shown above.

In the trunk, on the right side behind the liner, you'll find the OEM subwoofer and OEM rear amplifier. If you just pull the liner aside, it's right there, hard to miss. There are three connectors on the amp.

The procedure here is the same as for the front amp. You can tap into the wires on these connectors and feed those signals into your aftermarket equipment. The OEM subwoofer is a dual-coil subwoofer, fyi. So there are two signals coming out of the amp, but they're identical.

Instead of powering an audio system from the Model 3's 12V accessory battery, we power it from the 12V DC-DC converter on the car's high-voltage main battery. The main battery is located under the floor, directly underneath the cabin, and the "penthouse" containing all of the control systems and external connections is located underneath the rear seats. So if you push the two clips on the front side of the rear seats that hold the seat cushions in place and lift up the seat cushions, there's the penthouse. On the left side of the penthouse is a large orange connector. That's the high-voltage charging line for the main battery. Leave it alone. On the right side is a small red boot with a screw terminal inside that should be energized to 14-15VDC, and that's our "12V" supply. I'm told it can deliver at least 200A and I believe it. Not only is this 12V source very high-capacity, but the computer that controls it is very fast. A 12V lead-acid battery can deliver a lot of amperage, but it takes a non-zero amount of time for it to build up to high amperages and that is why we use stiffening capacitors in high-powered aftermarket systems. Our solid-state DC-DC converter can deliver 100A or more instantaneously. This also makes aftermarket stiffening capacitors completely unnecessary. Additionally, this allows us to use three feet of power cabling from the rear seat to the trunk instead of twelve feet from the frunk to the trunk.
Update 2019-06-22:
I found an article explaining how to completely power down the car's 12V systems, which seems like a good idea when working on those. I haven't tried it myself. (https://www.mountainpassperformance.com/tesla-model-3-hard-reset/)


In addition to a power supply, we need a turn-on signal. This is a 12V signal that turns high or low to tell our aftermarket equipment to turn on and off when the car turns on and off. If we go back to VC_L, there's a pin we can connect to that will provide us with a turn-on signal. I'm told that it's the "trailer pin" intended to provide power for lights on a trailer. But since I don't have a trailer, or a trailer hitch, I use it for audio. If you reach up and backward along VC_L, inside the dash you'll find a fairly large connector capable of holding six large-gauge wires. The top-forward pin, which is not connected to anything, is our turn-on signal. This pin is energized with 12V at up to 10A (or so I'm told) whenever the car is on, which means whenever the center display is on. We can push a plain 3/16" female quick disconnect onto that pin and then run a wire from there back to our audio equipment. Here are two videos that show how to find and connect to the appropriate pin (1, 2). You can also tap into the 12V supply for the cigarette lighter, which is also found on VC_L, but that causes some problems. The cigarette lighter's behavior has changed over time and recently Tesla updated the control software such that the cigarette lighter stays powered on for about an hour after the car turns off. I don't know why, they just did. And that means all your aftermarket stereo equipment will stay on for an hour after the car turns off, which might burn a significant amount of energy.
Update 2019-06-09:
Apparently this pin is factory-populated now. I don't know where the wire terminates, but the pin behavior appears to be unchanged. So this should actually make it easier to work with, as now we can just tap into the factory wire instead of pushing in our own connector.

Now we have our two connections, our power supply and our turn-on signal, but there's a problem. That power supply is not quite like the lead-acid battery on a traditional car. Traditionally, when we hook up our amplifiers for the first time we charge them slowly using a resistor to limit current and prevent damage to the amplifiers and/or the battery, and after that the amplifiers stay charged as long as the battery is charged. But the 12V converter in the Model 3 switches on and off when the car goes to sleep. If we just connected our amplifiers directly to the converter, our amplifiers would discharge when the car went to sleep and then try to charge from zero up to ~14V instantly when the car woke back up. This would pull tens or hundreds of amps for a millisecond or two, causing the converter to trip on over-current. Then we'd get error messages saying "Cannot Maintain Vehicle Power" and the car would refuse to drive for the next hour or several hours. I didn't enjoy this when it happened to me, and I'm guessing you wouldn't enjoy it if it happened to you. So we need an automatic system that slow-charges our amplifiers every time the car wakes up.

We have two wires, power and turn-on, and we have to use these to control the charging of our amplifiers. If we put a relay and a resistor in parallel in our supply line, then our amplifiers are powered through the resistor with limited current flow when the relay is open and through the relay with unlimited current flow when the relay is closed. And if the relay is controlled by the turn-on signal, then our amplifiers charge slowly through the resistor when the car is awake but turned off and then are directly connected with no current limit when the car is turned on. It takes one or two seconds for the car to turn on after it wakes up, the worst case being when you walk up to the car and pull on the door handle while it's still asleep. And with a 1Ω resistor (a big one, 100W or larger), a 0.25F bank of capacitors will charge in less than one second, so we should be good.


I want to be very clear here so no one lights their car on fire. You need to use a resistor that's rated for 100W or more. It will be big (about the size of your thumb). It will be mounted inside a metal case. Don't use a tiny metal film resistor or even a ceramic resistor, because they won't be able to handle the repeated bursts of heat generation over time.


When I bought my previous car, I stripped it down to the frame and lined the interior with butyl damping material and mass-loaded vinyl + closed cell foam insulation. It made a big difference. It reduced the noise floor, which meant you could hear detail in your music without turning the volume up high. I planned to do the same with my Model 3, but when I started disassembling the trunk and cabin I realized the Model 3 is already very well insulated. The trunk is completely lined with the same foam+MLV that I planned to use (OEM insulation has a bit less vinyl and a bit more foam), and the frame was already speckled with pieces of spray-on butyl. On top of that, there's no exhaust or engine noise to worry about. Road noise in the Model 3 is also surprisingly low. I anticipated not lining the cabin floor, as there's a thick battery there and no noise is getting through. I ended up adding a bit more butyl here and there in the trunk, and I lined the doors with MLV, as they only had a bit of butyl inside. But that's it. The rest of the trunk and cabin are already very well insulated. I would recommend not spending much time with sound insulation, as it's incredibly time consuming and you're not likely to get much additional benefit. If you don't do any insulation at all, you'll probably be fine.
That covers my reverse engineering work on the Tesla Model 3. The OEM audio electronics provide an outstanding foundation for an aftermarket system and once you know how to properly charge your amplifiers, the installation is just like in any other car. It's fairly easy to use the OEM signals for an aftermarket subwoofer or full-range stereo and there's more than enough room available in the trunk for a moderately sized system. Thanks to Ingineerix, Defjukie, JWardell, and JamieSibley for the information they provided in this process.

Also I wanted my aftermarket system to be as close to invisible as possible, so I planned to install all of the speakers in factory locations. As I said before, the Model 3 factory premium stereo includes fifteen speakers, ten of which are in the front half of the car, so I had plenty of options for how to mount my Focal three-way components. I ended up designing and 3D printing brackets to mount the Focal tweeters, mids, and woofers into the front OEM locations. The mids brackets were easy. The woofer brackets took three iterations to get right. The tweeter mounts took fourteen iterations. I've posted all of those parts on GrabCAD, in case they're useful for someone. There are two versions, one that fits the Focal Utopia M series and one that just has blank faces that can be cut and drilled for just about any other speaker. I disconnected the center mid+tweeter and I disabled the overhead imaging tweeters and tuned down the rear mids via the car's stereo settings.


I planned to mold a fiberglass subwoofer box to fit the trunk, just like I did in my previous car, but the Model 3's trunk is a bit more complicated. So I ended up making a cardboard mold that fit into the space of the OEM subwoofer and then I made a fiberglass box from that. I was aiming for >1ft³, but due to the complexity of the available space I ended up with 0.8-0.9ft³. According to Focal's specs, it shouldn't make that much of a difference. After making the box, I cut a hole through the trunk liner and used some left over fiberglass to make a cover for the hole.


I originally planned to feed eight signals into my DSP. I tapped into and routed wires from the front door tweeters, front dash mids, front door woofers, and subwoofer (×2). However, it turns out the JL Fix82 doesn't like redundant spectrum and so I removed the woofer signals. Anyway, I routed my tapped signals along the edges of the floor on both sides, just as you'd probably imagine.


I planned to install my electronics in the well underneath the trunk floor, where the spare tire would be if the car had a spare tire. I cut out the liner in that area and lined the car body with insulation and carpet. Then I mounted my amplifiers and DSPs onto a sheet of plywood cut to fit the well. For power control, I ended up using a 60A solid state relay and a 2.4Ω, 100W resistor.


Since this well is normally sealed shut and is well insulated and contains 2300W of power electronics, I thought a basic cooling system would be a good idea. I cut another sheet of plywood to cover up the electronics, cut vents through it, attached an 80mm fan to one of the vents, and wrapped it all in carpet.


Last of all, I needed to mount the remote control knob for my Twk88 DSP. I tried a few locations and ended up putting it on the bottom of the center display. I printed a mount and attached it to the display with 3M wall-hook adhesive tabs. I didn't expect them to be strong enough and I was planning on replacing them with epoxy, but they work great.

That's just about everything. I've tuned my system about a dozen times, and I'll probably re-tune it a dozen more times before I decide it's not going to get any better. It sounds absolutely incredible. The Focal Utopias are pricey, but they sound better than any other car speakers I've heard. They're transparent. The mids and tweeters really shine with acoustic and acapella music. The 10WM subwoofer is also crystal clear at all volumes, even when it's making the windows shake. This is a really amazing system for a terrific car. And it's pretty close to invisible. The little DSP control knob is the only thing that gives it away.
Of course I've taken a lot of knowledge from other sources around the internet, and I'd like to give another thank you to the Car Audio Fabrication YouTube channel. This guy has been making outstanding how-to videos for years and I probably watched and learned from thirty or so of them during this build.
That's it. That's all there is. More detail is provided in the previous posts, though I'm not planning to go back and correct the errors there so you'll want to compare that older information with the correct information posted on this page. If you have any questions, I never check the comments here but feel free to email me. I hope this is useful to someone, and good luck.
Update 2019-06-05:
Something to keep in mind, this article is written for my 2018 Model 3 Long Range with the Premium sound system. If you have a Model 3 Standard Range with a Standard or Partial Premium stereo, some of this information will to be relevant to you and some of it will not. The power systems and speaker locations/geometry will be the same, but you won't have the rear amplifier or subwoofer and some of your speakers will be disconnected. Other people are putting together how-to instructions for the SR/SR+ and the best compilation I've seen is here, on Tesla Owners Online.
Additionally, Tesla is continuously updating the Model 3's hardware. At least one wiring connector has changed since I took delivery of my car (the VC_Left 12V turn-on pin is now populated). I expect more changes will take place in the future.
Update 2020-06-01:
As of Software Update 2020.16.2.1, the VC_Left pin that I used as a turn-on signal now stays on 24/7. That's no good. The best option probably is to use the cigarette lighter 12V in its place. This circuit is accessible via the diagnostic connector behind the center console. Information on that is available in this later blog post.
As of Software Update 2020.16.2.1, the VC_Left pin that I used as a turn-on signal now stays on 24/7. That's no good. The best option probably is to use the cigarette lighter 12V in its place. This circuit is accessible via the diagnostic connector behind the center console. Information on that is available in this later blog post.
----------------
This has been a big project. A little bit bigger than I anticipated and much bigger than I hoped. It has consumed most of my free time for the past four months. I've written up these posts here in the hopes that other people can do similar work in significantly less time, with very few unexpected problems.
I put myself on the waiting list for a Tesla Model 3 back in 2017, and I took delivery of my car in October 2018. This is my third car. The first two were Honda Civics, and as soon as I got those I tore them apart and installed aftermarket stereos. I expected I would do the same with my Model 3, but when I got it I found that the OEM stereo was actually really good. For an OEM stereo. It has good power, good detail, good clarity, good body, good just about everything. Frankly it's the best OEM car stereo I've ever heard. And that's compared to "premium" stereos I've listened to from Lexus, BMW, Acura, Volkswagen, Audi, and in the Tesla Model S. But it's still an OEM stereo. And I'm an audio snob. So after a few months I knew I had to upgrade.
The prospect of upgrading the stereo was a bit daunting at first because the Tesla Model 3 is not a regular car. The power and control systems are significantly different from those of traditional cars and Tesla is notoriously tight-lipped about providing disassembly and repair info for their vehicles. So I expected that I might break a few things and I would have to reverse engineer a few more things in order to get my aftermarket stereo up and running, but I guessed I could probably figure it out. And as it turns out the Model 3 is different, but not that different (for this purpose). And once you understand the (one major) difference, anyone who understands how a traditional car stereo works should be able to install an aftermarket system in a Tesla Model 3 with no problems at all.
This post is split into two parts. The first part summarizes all the reverse-engineering I did on the Model 3 and explains everything a typical car audio enthusiast needs to know to do their own aftermarket installation. The second part summarizes my own installation, parts of which might also be useful for other people building their own aftermarket systems.
Tesla Model 3 Stereo Technical Info
OEM Speakers

Premium Speaker Layout
The Tesla Model 3 factory premium sound system has fifteen speakers powered by two amplifiers. (The standard sound system has eight speakers powered by one amp.) That includes five 1" tweeters, seven 3.5" mid-range speakers, two 7" woofers, and one 8" dual-coil subwoofer. They're all fairly standard paper-cone OEM speakers.
Premium Speaker Specs

The speakers in the front doors and front dash, as well as the subwoofer in the trunk are all easy to remove. You can access the front dash mids and center speakers by simply pulling the covers off the A-pillars (top edge first, then bottom) and then pulling up the speaker grille bar that runs the full width of the dash. The front door tweeters pop right off, just pull up on them. The front door woofers are easily accessible by removing three torx screws that hold each door panel in place, and then using a plastic (not metal) prybar to pop the door panel off (bottom first). The subwoofer is easily accessible by pulling off the plastic covers at the top and bottom edge of the trunk opening and then pulling the trunk liner out from under the trunk lid seal.
The overhead imaging tweeters, the mids in the rear doors, and the mids in the rear dash are much more difficult to access and remove. The overhead imaging tweeters are glued directly into the roof liner, which makes them very difficult to access and modify. The mids in the rear doors are the same part as all the other mids, but in the rear doors they're sonic-welded in place, which means you would have to cut them out. I don't know much about the mids in the rear dash, because I wasn't even able to access them. They're built into the rear dash cover, which is very difficult to remove.
OEM Audio Signals
Unfortunately, there is no way to pull an unadulterated stereo source signal out of the Model 3 (as far as I know). The front amplifier is built directly into the car's main computer. The rear amplifier connects to that same computer using a single pair of wires that carry a protocol called A2B, developed by Analog Devices. AD doesn't make A2B equipment available to the general public, and even if they did our wires don't carry the original source signal. They carry a bunch of chopped up portions of the original signal. That means we have to get the audio signal for our aftermarket system by re-combining the signals from several of the OEM speaker wires. Luckily, the OEM speaker signals are of outstanding quality. I briefly considered looking inside the OEM amplifiers and trying to pull line-level signals from there, but it looks like the A2B chips connect to digital amplifiers using I²C and I have no desire to try to decode that.
Spectrograph of white noise through OEM Premium stereo

Premium Speaker Ranges
I did a spectrum analysis on the OEM speakers and got more or less textbook results. 40-60Hz is boosted way above everything else, because that's what people seem to like these days, but otherwise our spectrum looks very good.

Premium Subwoofer Signal, 50Hz at Max Volume
Next I checked waveforms for clipping and found none. None at all. Even on the subwoofer, even at max volume. That's amazing in an OEM system. The Model 3's premium stereo is producing near-perfect sine waves at 45V.

Premium Speaker Voltages vs Volume Levels
Additionally, the OEM system gives a perfectly linear increase on all channels. Typically, OEM systems that have subwoofers stop boosting the subwoofer after a certain point because it's undersized compared to the rest of the system and they don't want to damage it, but the Model 3 premium subwoofer goes all the way up. This is really good news. This means we don't have to take any weird, nonlinear optimizations into account when designing and tuning an aftermarket system. The Model 3's OEM stereo just does what stereos are supposed to do, all the way to the top, without cutting any corners.
At this point we have several options, depending on what we want to do.
- If you just want more bass, you can install an aftermarket amplifier and subwoofer. You can tap into the OEM subwoofer signal on the rear OEM amplifier and feed that into your aftermarket amplifier. (Use a level shifter if your amp doesn't have that built in)
- If you want a bit more clarity, you can simply replace the OEM speakers with aftermarket speakers. You'll want to get speakers with ratings similar to the OEM speaker ratings.
- If you want to build a full-range aftermarket system but you don't plan on using a DSP, you can feed the OEM signals into your amplifiers, one-to-one, and your aftermarket speakers will sound great. (Use a level shifter if your amps don't have that built in)
- If you want to build a full-range aftermarket system and you want to do some signal processing, then you'll need to feed several of the OEM signals into a DSP designed to recombine them to recreate the original stereo source signal.
OEM Amplifiers

Front computers from the front passenger's floor

ICE Computer, looking up underneath the glove compartment
The front amp is built into the car's main computer (which I believe is called the "ICE" computer), so be very, very careful when working on this. If you cut the wrong wire, you could seriously damage your car. There are three connectors on the right side of the computer housing and the lower connector contains all of the speaker signals. I recommend turning the car off via the main menu (Settings → Safety and Security → Shutdown) before removing or reinstalling this connector.

Premium Front Amplifier Connectors
(Standard Range and SR+ vehicles have different wiring colors and arrangements and unfortunately I don't have a diagram for those)
Once you remove this connector, you'll have access to the front tweeter, mid-range, and center speaker signals. The center mid and tweeter are both powered by the same connection, with a capacitor filtering lower frequencies out of the tweeter. I tapped into these signals by cutting the wires coming out of this connector and splicing in my own wires, which run all the way to the trunk to my DSP. You could also use tap-in connectors to tap the wires without cutting them, though I've never been a fan of those.

VC_L shown here, VC_R is mirror image
To the right of ICE you have Low Voltage Control Right (VC_R). I believe this box contains various components that control various auxiliary functions, but I haven't found an actual teardown and analysis anywhere and I had no desire to open it up myself. What I do know is that VC_R and VC_L have a lot of connectors going through them and one of these connectors contains the wires that go into each respective front door. And that's where we can tap into the door speaker wires, so we don't have to route our own wires into the doors. For some reason the tweeter has its own connector, and the woofer is the largest wire pair on the larger connector. VC_R and VC_L are mirror images of each other and the connectors have the same wires in the same locations. Wires typically do not change color, so for example the left tweeter wire pair is purple/black when it comes out of the ICE computer and it's still purple/black when it goes into the left door via the VC_L connector shown above.

Premium Rear Amplifier
(I forgot to take pictures of this, so this image is taken from TeslaOwnersOnline)In the trunk, on the right side behind the liner, you'll find the OEM subwoofer and OEM rear amplifier. If you just pull the liner aside, it's right there, hard to miss. There are three connectors on the amp.

Premium Rear Amplifier Connectors
(Standard Range and SR+ vehicles have different wiring colors and arrangements and unfortunately I don't have a diagram for those)
The procedure here is the same as for the front amp. You can tap into the wires on these connectors and feed those signals into your aftermarket equipment. The OEM subwoofer is a dual-coil subwoofer, fyi. So there are two signals coming out of the amp, but they're identical.
Power Systems
The one part of the Model 3 that is fundamentally different from a traditional car is the power system (big surprise). In a traditional car, you connect your stereo equipment directly to the car's 12V battery. The Model 3 does have a traditional 12V lead-acid "car battery" just behind the frunk, but this battery is closely monitored by the car's computer and the car gets unhappy when more energy is pulled from the battery than is expected. People who have connected even small devices to this accessory battery have gotten frequent error messages about the battery being damaged and needing replacement. I personally haven't attempted to power my system this way, and so I can't give any advice on how to get around those error messages. Luckily, there's another option which not only avoids all the error messages, but also delivers more, faster, better power than a small lead-acid battery ever could.
Main battery power connections
Instead of powering an audio system from the Model 3's 12V accessory battery, we power it from the 12V DC-DC converter on the car's high-voltage main battery. The main battery is located under the floor, directly underneath the cabin, and the "penthouse" containing all of the control systems and external connections is located underneath the rear seats. So if you push the two clips on the front side of the rear seats that hold the seat cushions in place and lift up the seat cushions, there's the penthouse. On the left side of the penthouse is a large orange connector. That's the high-voltage charging line for the main battery. Leave it alone. On the right side is a small red boot with a screw terminal inside that should be energized to 14-15VDC, and that's our "12V" supply. I'm told it can deliver at least 200A and I believe it. Not only is this 12V source very high-capacity, but the computer that controls it is very fast. A 12V lead-acid battery can deliver a lot of amperage, but it takes a non-zero amount of time for it to build up to high amperages and that is why we use stiffening capacitors in high-powered aftermarket systems. Our solid-state DC-DC converter can deliver 100A or more instantaneously. This also makes aftermarket stiffening capacitors completely unnecessary. Additionally, this allows us to use three feet of power cabling from the rear seat to the trunk instead of twelve feet from the frunk to the trunk.
Update 2019-06-22:
I found an article explaining how to completely power down the car's 12V systems, which seems like a good idea when working on those. I haven't tried it myself. (https://www.mountainpassperformance.com/tesla-model-3-hard-reset/)

Reaching the 12V turn-on signal

12V trailer power pin
In addition to a power supply, we need a turn-on signal. This is a 12V signal that turns high or low to tell our aftermarket equipment to turn on and off when the car turns on and off. If we go back to VC_L, there's a pin we can connect to that will provide us with a turn-on signal. I'm told that it's the "trailer pin" intended to provide power for lights on a trailer. But since I don't have a trailer, or a trailer hitch, I use it for audio. If you reach up and backward along VC_L, inside the dash you'll find a fairly large connector capable of holding six large-gauge wires. The top-forward pin, which is not connected to anything, is our turn-on signal. This pin is energized with 12V at up to 10A (or so I'm told) whenever the car is on, which means whenever the center display is on. We can push a plain 3/16" female quick disconnect onto that pin and then run a wire from there back to our audio equipment. Here are two videos that show how to find and connect to the appropriate pin (1, 2). You can also tap into the 12V supply for the cigarette lighter, which is also found on VC_L, but that causes some problems. The cigarette lighter's behavior has changed over time and recently Tesla updated the control software such that the cigarette lighter stays powered on for about an hour after the car turns off. I don't know why, they just did. And that means all your aftermarket stereo equipment will stay on for an hour after the car turns off, which might burn a significant amount of energy.
Update 2019-06-09:
Apparently this pin is factory-populated now. I don't know where the wire terminates, but the pin behavior appears to be unchanged. So this should actually make it easier to work with, as now we can just tap into the factory wire instead of pushing in our own connector.

Error messages caused by excessive inrush current on wake-up
Now we have our two connections, our power supply and our turn-on signal, but there's a problem. That power supply is not quite like the lead-acid battery on a traditional car. Traditionally, when we hook up our amplifiers for the first time we charge them slowly using a resistor to limit current and prevent damage to the amplifiers and/or the battery, and after that the amplifiers stay charged as long as the battery is charged. But the 12V converter in the Model 3 switches on and off when the car goes to sleep. If we just connected our amplifiers directly to the converter, our amplifiers would discharge when the car went to sleep and then try to charge from zero up to ~14V instantly when the car woke back up. This would pull tens or hundreds of amps for a millisecond or two, causing the converter to trip on over-current. Then we'd get error messages saying "Cannot Maintain Vehicle Power" and the car would refuse to drive for the next hour or several hours. I didn't enjoy this when it happened to me, and I'm guessing you wouldn't enjoy it if it happened to you. So we need an automatic system that slow-charges our amplifiers every time the car wakes up.

Current-limiting circuit
We have two wires, power and turn-on, and we have to use these to control the charging of our amplifiers. If we put a relay and a resistor in parallel in our supply line, then our amplifiers are powered through the resistor with limited current flow when the relay is open and through the relay with unlimited current flow when the relay is closed. And if the relay is controlled by the turn-on signal, then our amplifiers charge slowly through the resistor when the car is awake but turned off and then are directly connected with no current limit when the car is turned on. It takes one or two seconds for the car to turn on after it wakes up, the worst case being when you walk up to the car and pull on the door handle while it's still asleep. And with a 1Ω resistor (a big one, 100W or larger), a 0.25F bank of capacitors will charge in less than one second, so we should be good.
NO

Small resistors, too small for our charging circuit
(Image shamelessly stolen from http://ecee.colorado.edu/~mathys/ecen1400/labs/resistors.html)
YES

Large resistors, big enough for our charging circuit
(Image shamelessly stolen from https://www.ohmite.com/aluminum-housed/)
I want to be very clear here so no one lights their car on fire. You need to use a resistor that's rated for 100W or more. It will be big (about the size of your thumb). It will be mounted inside a metal case. Don't use a tiny metal film resistor or even a ceramic resistor, because they won't be able to handle the repeated bursts of heat generation over time.
OEM Insulation

Stripped down rear seat and trunk

OEM insulation from trunk (foam and MLV)
That covers my reverse engineering work on the Tesla Model 3. The OEM audio electronics provide an outstanding foundation for an aftermarket system and once you know how to properly charge your amplifiers, the installation is just like in any other car. It's fairly easy to use the OEM signals for an aftermarket subwoofer or full-range stereo and there's more than enough room available in the trunk for a moderately sized system. Thanks to Ingineerix, Defjukie, JWardell, and JamieSibley for the information they provided in this process.
My Stereo Installation
As I said, this is my third car stereo build. Obviously this one had to be bigger and better than the previous two, and that limited my options. I decided to go with Focal's new Utopia M speakers powered by Focal's FPX amplifiers. The Tesla OEM stereo produces terrific signals so there's no reason to install an aftermarket head unit, but I did want a good DSP so I could tune my new system as far as it would go and I ended up selecting JL's Fix82+Twk88.
Final configuration for my aftermarket stereo
Also I wanted my aftermarket system to be as close to invisible as possible, so I planned to install all of the speakers in factory locations. As I said before, the Model 3 factory premium stereo includes fifteen speakers, ten of which are in the front half of the car, so I had plenty of options for how to mount my Focal three-way components. I ended up designing and 3D printing brackets to mount the Focal tweeters, mids, and woofers into the front OEM locations. The mids brackets were easy. The woofer brackets took three iterations to get right. The tweeter mounts took fourteen iterations. I've posted all of those parts on GrabCAD, in case they're useful for someone. There are two versions, one that fits the Focal Utopia M series and one that just has blank faces that can be cut and drilled for just about any other speaker. I disconnected the center mid+tweeter and I disabled the overhead imaging tweeters and tuned down the rear mids via the car's stereo settings.

Mid-range speaker comparison

Mid-range speakers installed

Woofer comparison

Woofer rain cover

Woofer installed

Many iterations of tweeter housing

Final tweeter housing

Tweeter installed

Almost identical to OEM housing
I planned to mold a fiberglass subwoofer box to fit the trunk, just like I did in my previous car, but the Model 3's trunk is a bit more complicated. So I ended up making a cardboard mold that fit into the space of the OEM subwoofer and then I made a fiberglass box from that. I was aiming for >1ft³, but due to the complexity of the available space I ended up with 0.8-0.9ft³. According to Focal's specs, it shouldn't make that much of a difference. After making the box, I cut a hole through the trunk liner and used some left over fiberglass to make a cover for the hole.

Fiberglass sub box installed

Subwoofer installed behind liner

Spectrum from tuned Fix82

Aftermarket speaker cables routed along door sill
I planned to install my electronics in the well underneath the trunk floor, where the spare tire would be if the car had a spare tire. I cut out the liner in that area and lined the car body with insulation and carpet. Then I mounted my amplifiers and DSPs onto a sheet of plywood cut to fit the well. For power control, I ended up using a 60A solid state relay and a 2.4Ω, 100W resistor.

Testing aftermarket electronics

Aftermarket electronics installed

Cooling space above electronics

Electronics cover with cooling vents and fan

Storage space retained above aftermarket electronics

Final installation is unobtrusive, consumes no trunk space

DSP control knob installed on center display
Of course I've taken a lot of knowledge from other sources around the internet, and I'd like to give another thank you to the Car Audio Fabrication YouTube channel. This guy has been making outstanding how-to videos for years and I probably watched and learned from thirty or so of them during this build.
That's it. That's all there is. More detail is provided in the previous posts, though I'm not planning to go back and correct the errors there so you'll want to compare that older information with the correct information posted on this page. If you have any questions, I never check the comments here but feel free to email me. I hope this is useful to someone, and good luck.
Next, Part 10: DSP Epilogue