More than a year ago I started building a greenwall for my bedroom. Building the wall was the easy part, and that only took a few days. Then I built a lighting system for it. Then I automated the lighting so it would turn on every morning and turn off every evening, which is important for a system that's designed to run forever. Then I planted the first few rows of plants. Then I started trying to automate the watering system, because watering hundreds of plants every day or so is a lot of work and I'll be gone from my apartment for potentially weeks at a time and I don't want all of my plants to die.
The frame hasn't changed. It's a rectangle made of 2x3 boards held together by dowels and cables. It works. The siding on top of that works. The felt pockets on top of that work. The gutters on the bottom work.
The lighting system was fairly easy to build. I bought COTS LED grow lamps, printed parabolic reflectors to focus them, and mounted four of them on the ceiling. I put together a relay board to turn them on and off every day. Very simple and reliable.
I tried quite a few different plants, some of which worked well and some of which did not. Pothoses and Philodendrons work great (not surprising). ZZs work well. Grasses like mongo grass and baby tears worked okay, grew all over the place, but brought in tons of insects which is not something I wanted. I've also added in a wide variety of ferns, which should do well in low light. Some of the heartier variants have done extremely well (antarctica, maiden hair, deer's tongue, alaska) and some of the more delicate varieties didn't last very long (japanese painted).
Automation of the watering system has taken the most time, by far. I went through several designs to get to what I have now. The felt pockets wick water down the backside of the wall, so if I simply dripped water over the top row it would flow toward the back and bypass the other twelve rows below. So I need to irrigate all 13 rows individually. Originally I strung vinyl tubes along each row and poked holes in the tubes to drip water over each plant. This was a mess. The holes needed to be about half a millimeter in diameter and I had to cut them all by hand with tiny drill bits that broke frequently. Then after I cut them they would clog very easily or would just close up due to the flexibility of vinyl. I tried connecting three rows to a single pump, but the pumps I was using didn't have sufficient capacity to water all three rows effectively. So I ended up connecting a pump to each individual row. That meant I had to power and operate thirteen separate pumps. I didn't want to put together a giant power supply to run them all at once, so I put together a PCB with a bunch of MOSFETs to power the pumps one at a time. Still, the tiny pumps that worked well on the bottom rows weren't powerful enough to push water up to the top rows, so I started looking at more powerful pumps. Eventually I decided this was just a bad design. Regardless of how I distributed the water, I definitely needed a pump powerful enough to push water up to the top row. So I bought one. A nice little $40 DC pump designed to provide faucet pressure for RVs and similar. Instead of buying 13 of those, I decided to get a distribution valve to send water to one row at a time. I couldn't find anything in production that would connect one input to thirteen outputs and select between them, and I didn't want to build an enormous manifold of twelve solenoid or motor valves, so I built a little selector valve with a stepper motor and 3D printed parts that would just rotate to select an outlet. That took a few iterations to get right, but now it's very simple and works well enough. And I only need one pump and one motor, instead of thirteen pumps.
Originally I controlled all of this using my a TI Tiva TM4C plus some relays thrown on to a project board. After all of the functionality stabilized, I drew up a PCB using the Raspberry Pi Pico that I just discovered, which is a HUGE improvement. No more relays, everything is solid state, and the final board is smaller than the original MCU on its own. And of course code is on gitlab.
Then I replaced the vinyl hoses with proper irrigation fittings, which are dirt cheap when you buy them in bulk, don't clog, and allow me to adjust the drip rate up or down for each individual plant.
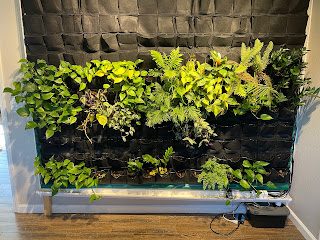
As of now I have the wall almost half-planted, which is something I couldn't have done when I had to water it by hand every day. (I do have to water the plants every day because the felt pockets don't retain any water at all.) As you can see, some of the plants are not very happy so I have plenty of tuning to do, which mainly consists of adjusting all of the sprinkler heads over time. I should be able to fill the upper half largely by propagating plants from the lower half. I'm also throwing in random herbs and new plants as is convenient. Hopefully by this time next year it will be full and I'll have forgotten how the automation even works.